Many of the Oracle Fusion Middleware components require the existence of schemas in a database prior to installation. These schemas are created and loaded in your database using the Repository Creation Utility (RCU).
Here I am going to explain steps for Running RCU and Creating Schemas for Oracle SOA 12.2.1
Step 1:
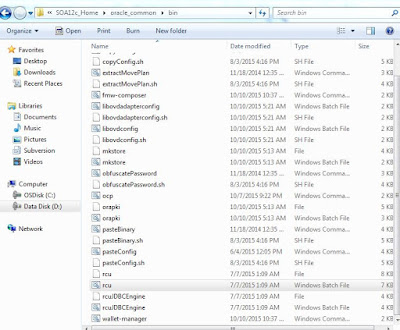
Navigate to oracle_common/bin in your installation directory.
e.g.
D:\Oracle_Home\SOA12c_Home\oracle_common\bin
Here you will see below, files
Step 2:
Locate rcu.bat, Double click on it, it will a new window in some time as below. Then click on Next button.
Step 3:
Now you need to have SYSDBA credentials of your DB, Select 'System Load & Product Load' then Click next.
If you do not have SYSDBA credentials, select other options as suitable.
Step 4:
Enter details of your DB and click on Next button.
Step 5:
It will try to connect to your DB, the Click on OK Button.
Step 6:
Enter the Prefix of your Schemas, then click Next
Step 7:
It will check for Pre requisite, once completed click on OK button
Step 8:
Enter the Password for the Schemas, you can either keep the same password across schemas or different for each schema. Then Click on Next button
Step 9:
Select space requirement for your schema, then click Next
Step 10:
It will show you Temp table against each schema, Click on Next Button
Step 11:
It will show you a warning that, tablespaces will be created, Click on Ok
Step 12:
It will create Tablespace, once completed click on Next Button
Step 13 :
Here you will see a summary screen, make note of the Schema names, then click Create.
Step 14 :
You will see a completion summary screen, Click on Close button.
Voila !
You have successfully completed creation of new Schemas for SOA 12.2.1
Here are few related posts, which may interest you
1.Oracle SOA Suite 12c 12.2.1 - Installation for Windows
http://osb-dheeraj.blogspot.in/2016/02/oracle-soa-suite-12c-1221-installation.html
2. Repository Creation Utility (RCU) - Creation of DB Schemas for SOA 12.2.1
http://osb-dheeraj.blogspot.in/2016/02/repository-creation-utility-rcu.html
3. Oracle SOA Suite 12c - SOA Domain Configuration
http://osb-dheeraj.blogspot.in/2016/02/oracle-soa-suite-12c-soa-domain.html


No comments:
Post a Comment