Hi Guys, Today we are going with Steps for File Based MDS configurations.
STEP 1 :
Login to EM console.Expand SOA and right click on soa-infra and selcet Adminstration -->MDS configuration.

STEP 2:
Click on Export button on MDS configuration screen and save it your local disk
unzip the folder soa_infra_metadata, you will see the
apps folder.
All your project related WSDlS,XSD,fault-policy.xml,fault-binding.xml etc will be inside the apps folder.
STEP 3:
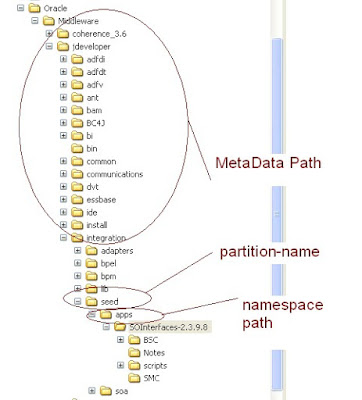
Now go to your C:\Oracle\Middleware\jdeveloper\integration\seed folder in your system, or it could be any other location as well, based on your Installation directory.
The above path created automatically while you installed JDeveloper studio.
STEP 4:
Copy and Paste apps folder, which you have got in from STEP 2.
Now its look like C:\Oracle\Middleware\jdeveloper\integration\seed\
STEP 5:
To use these schemas/wsdl etc in Jdeveloper we need to add some parameters in adf-config.xml under Application Resources.
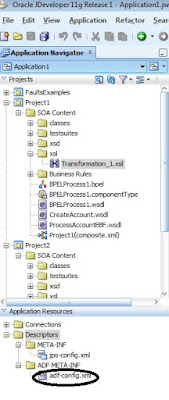
Click on the adf-config.xml
Note:For each and every application it has his own adf-config.xml file persist.
Once opened the file need to add metadata-storage-usage_2
<metadata-namespaces>
<namespace metadata-store-usage="mstore-usage_1" path="/soa/shared"/>
<namespace metadata-store-usage="mstore-usage_2" path="/apps"/>
</metadata-namespaces>
<metadata-store-usages>
<metadata-store-usage id="mstore-usage_1">
<metadata-store class-name="oracle.mds.persistence.stores.file.FileMetadataStore">
<property name="metadata-path" value="${oracle.home}/integration"/>
<property name="partition-name" value="seed"/>
</metadata-store>
</metadata-store-usage>
<metadata-store-usage id="mstore-usage_2">
<metadata-store class-name="oracle.mds.persistence.stores.file.FileMetadataStore">
<property name="metadata-path" value="C:\Oracle\Middleware\jdeveloper\integration"/>
<property name="partition-name" value="seed"/>
</metadata-store>
</metadata-store-usage>
</metadata-store-usages>

Note:
1. I have specify mstore_usage_2 path="/apps"-------because my all schemas under that folder only.Incase ur schemas under apps folder only u can specify path like path="/apps"
:Oher case if your schemas folder name is SOASchemas then u can specify path like
path="/apps/SOASchema"
2.Metadata-Path value must be C:\Oracle\Middleware\jdeveloper\integration in real time scenarios
3.Patition-name valuse must be seed in real time scenarios.
STEP 6:
To use a wsdl or any resource in your project use below reference.
<wsdl:types>
<schema xmlns="http://www.w3.org/2001/XMLSchema">
<import namespace="http://xmlns.example.com/unique/default/namespace/1103228635369" schemaLocation="oramds:/apps/ApplicationComponents/BAM/LoggingBAM.xsd"/>
</schema>
</wsdl:types>

Thats it guys.
STEP 1 :
Login to EM console.Expand SOA and right click on soa-infra and selcet Adminstration -->MDS configuration.
STEP 2:
Click on Export button on MDS configuration screen and save it your local disk
unzip the folder soa_infra_metadata, you will see the
apps folder.
All your project related WSDlS,XSD,fault-policy.xml,fault-binding.xml etc will be inside the apps folder.
STEP 3:
Now go to your C:\Oracle\Middleware\jdeveloper\integration\seed folder in your system, or it could be any other location as well, based on your Installation directory.
The above path created automatically while you installed JDeveloper studio.
STEP 4:
Copy and Paste apps folder, which you have got in from STEP 2.
Now its look like C:\Oracle\Middleware\jdeveloper\integration\seed\
STEP 5:
To use these schemas/wsdl etc in Jdeveloper we need to add some parameters in adf-config.xml under Application Resources.
Click on the adf-config.xml
Note:For each and every application it has his own adf-config.xml file persist.
Once opened the file need to add metadata-storage-usage_2
<metadata-namespaces>
<namespace metadata-store-usage="mstore-usage_1" path="/soa/shared"/>
<namespace metadata-store-usage="mstore-usage_2" path="/apps"/>
</metadata-namespaces>
<metadata-store-usages>
<metadata-store-usage id="mstore-usage_1">
<metadata-store class-name="oracle.mds.persistence.stores.file.FileMetadataStore">
<property name="metadata-path" value="${oracle.home}/integration"/>
<property name="partition-name" value="seed"/>
</metadata-store>
</metadata-store-usage>
<metadata-store-usage id="mstore-usage_2">
<metadata-store class-name="oracle.mds.persistence.stores.file.FileMetadataStore">
<property name="metadata-path" value="C:\Oracle\Middleware\jdeveloper\integration"/>
<property name="partition-name" value="seed"/>
</metadata-store>
</metadata-store-usage>
</metadata-store-usages>

Note:
1. I have specify mstore_usage_2 path="/apps"-------because my all schemas under that folder only.Incase ur schemas under apps folder only u can specify path like path="/apps"
:Oher case if your schemas folder name is SOASchemas then u can specify path like
path="/apps/SOASchema"
2.Metadata-Path value must be C:\Oracle\Middleware\jdeveloper\integration in real time scenarios
3.Patition-name valuse must be seed in real time scenarios.
STEP 6:
To use a wsdl or any resource in your project use below reference.
<wsdl:types>
<schema xmlns="http://www.w3.org/2001/XMLSchema">
<import namespace="http://xmlns.example.com/unique/default/namespace/1103228635369" schemaLocation="oramds:/apps/ApplicationComponents/BAM/LoggingBAM.xsd"/>
</schema>
</wsdl:types>

Thats it guys.


