Showing posts with label ICS. Show all posts
Showing posts with label ICS. Show all posts
Wednesday, June 01, 2016
Download directly to Unix/Linux from Internet/Oracle using WGET command
This summary is not available. Please
click here to view the post.
Saturday, February 27, 2016
OSB 12c - Domain Value map (DVM)
Hey guys !
Here I am going through the Domain Value map (DVM) functionality in OSB 12c.
In the 12c versions of OSB, Support for the DVM is included, Hence lets discuss the use case and Steps to implement DVM.
Use Case
Simple Integration Scenarios, Where Source system, Which sends data to Target System needs domain conversion of values.
A very typical example is Country name to Country Code conversion using DVM, i.e. Source system sends Country name and Target system expects Country code.
Design
Step 1 :
Open Jdevloper 12c (Service Bus console can also be used), Create a Service Bus Project.
I have given name to project as 'SBProject_DVM'
Step 2:
Create Source and target Schemas or WSDL (This is not a essential Step). For better demonstration, I Have used WSDL.
Step 3:
Create a Domain value map (CountryName_Code.dvm) and Add the Domain Name and Values. Atleast 2 rows needs be added.

Step 4:
Create a XSLT mapper (CountryNameToCode.xsl), Choose Source and Target to this mapper from your WSDL.
Step 5 :
User mapper to drag and Drop mapping element, Shown below

Step 6:
Go to XSLT source view and Edit the code as below
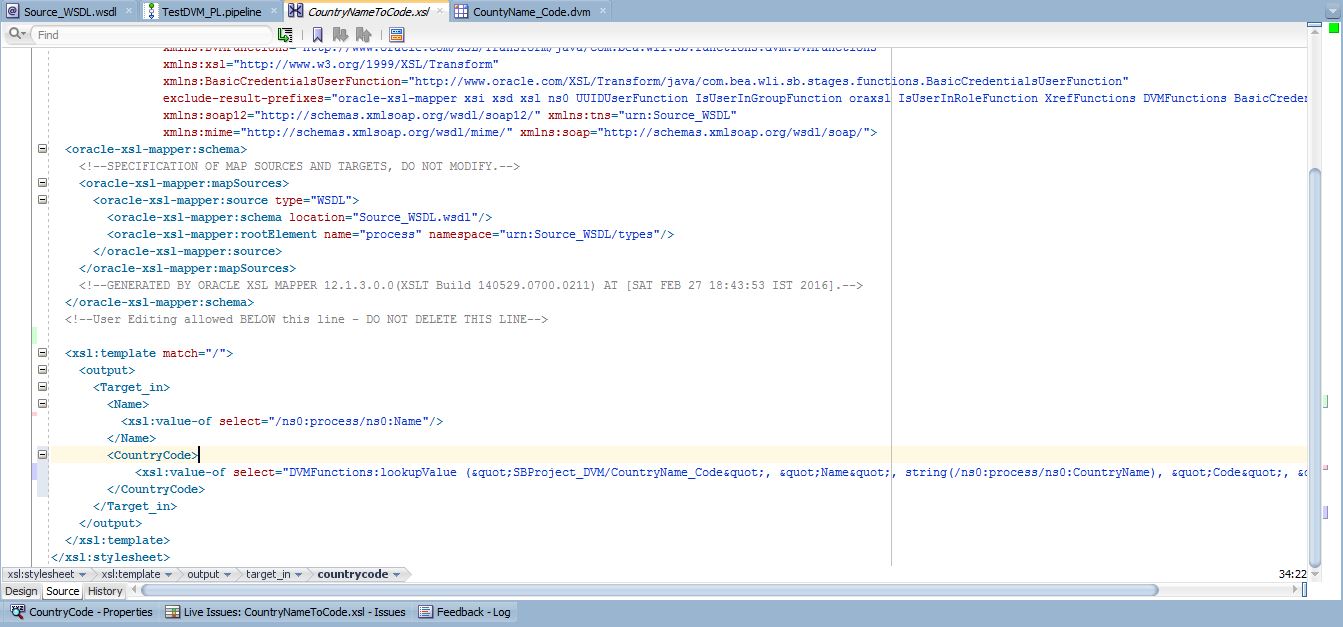
Add this snippet
<CountryCode>
<xsl:value-of select="DVMFunctions:lookupValue ("SBProject_DVM/CountryName_Code", "Name", string(/ns0:process/ns0:CountryName), "Code", "Unknown" )"/>
</CountryCode>
Now if you go to Design view, the below design will be visible

Step 7:
Create a new Pipeline Based on your WSDL and go to design view.
Add Pipeline pair to it,
Inside Request Pipeline add a Stage. Inside stage add a 'Replace' action.
Inside Response Pipeline add a Reply action with Success.

Step 8:
Lets go to Replace action and use the Earlier created XSLT mapper to do the DVM task.

In the input Field add the Variable which contains input element, as below

Step 9:
Save your changes and Export is to deploy to Test Server or Deploy directly from Jdeveloper.

Testing
Step 1:
Open the Pipeline, click on test button, this will open in new window


Step 2:
Edit the request payload and click on Execute button to test it.

Voila !
You have successfully created DVM using OSB 12c
You can download the sbconfig jar of this project from
https://drive.google.com/file/d/0BxHj0h0tnxxOWWVYVXVvTGtWUGs/view?usp=sharing
https://drive.google.com/file/d/0BxHj0h0tnxxOWWVYVXVvTGtWUGs/view?usp=sharing
Here are some other posts, which may interests you
1. Fusion Middleware 12c – SAP Adapter Configuration
http://osb-dheeraj.blogspot.in/2016/02/fusion-middleware-12c-sap-adapter.html
2. Oracle Integration Cloud Service (ICS)
http://osb-dheeraj.blogspot.in/2016/02/oracle-integration-cloud-service-ics.html
3. SOA Interview Questions : Service Oriented Architecture Interview Questions Part 1
http://osb-dheeraj.blogspot.in/2016/02/soa-interview-questions-service.html
Wednesday, February 17, 2016
Invoke Web service hosted at Oracle Integration Cloud Service (ICS) using SOAPUI - Part 2
This post is in continuation with my previous post, you can find the part 1 here
Step 5:
http://osb-dheeraj.blogspot.in/2016/02/invoke-web-service-hosted-at-oracle.html
Let's continue with steps
Step 5:
This will open a new Pop up, Select Basic, then click on OK.

Step 6:
Provide your Username and Password.

Step 7:
Now Right Click on the Request tab. You will see a window similar to below. Select 'Add WSS Username Token'

Step 8:
Select 'Password Text' and Click OK. This will add a Security Header in your Request.


Step 9:
Now again Right Click on Request Tab. Then Select "Add WS-Timestamp"

Step 10:
Select 60 in new pop up window Then click Ok.
This will Add Timestamp to your request


Step 11:
Now click on Test button, to execute the request. This button is highlighted in yellow

Step 12:
Thats all, you will receive the response from your ICS service

Congrats !, You have successfully invoked Web service hosted at Oracle ICS
For More Integrations and Design patterns, Please refer to My Other posts on ICS webservice integrations
1. Integration using Oracle ICS - Source ( Webservice ) to Target (Webservice)
http://osb-dheeraj.blogspot.in/2016/02/integration-using-oracle-ics-source.html
2. Oracle Integration Cloud Service (ICS) - Monitoring and Tracking Messages & Errors
http://osb-dheeraj.blogspot.in/2016/02/oracle-integration-cloud-service-ics_10.html
3. Oracle Integration Cloud Service (ICS)
http://osb-dheeraj.blogspot.in/2016/02/oracle-integration-cloud-service-ics.html
Integration using Oracle ICS - Source ( Webservice ) to Target (Webservice) Part 2
This post is in continuation with previous post, you can find part 1 at
http://osb-dheeraj.blogspot.in/2016/02/integration-using-oracle-ics-source.html
Lets continue with steps :
Create Integration using Source and Target Connection, Create Mapping:
Navigate to Integrations Screen and Click on 'Create New Integration'
A Screen similar to below will be seen

Step 1 :
Select 'Map My Data'. Screen shown Below will appear. Provide Name of the Integration and Click Create.


Step 2 :
Now Drag and Drop connections from Right Side Pane to Source .A screen as below will be shown. Provide Name of your Source, Then Click Next

Step 3 :
Select Operation from Available Operations. Then Click Next. As Shown below

Step 4 :
Verify the Summary, and Click Done

Step : 5
A Screen as shown below will appear.

Step 6:
Repeat Step 2 to Step 4 for Target connection. A Screen as below will appear

Step 7:
Now Click on 'Create Map' A + button will appear. Click on it, as shown below

Step 8:
You will be naviagated to Mapper Screen. Create a Source to target Mapping by Drag and Drop.
As Shown below


Step 9 :
Click on Save, and Exit Mapper. Shown below

Step 10:
Repeat Step 8 and Step 9 for Response Mapping.
A screen as below will be shown

Step 11:
Now Click on Tracking to add any field for Audit and tracking purpose. Then click on Done.
Shown below

Step 12 :
Now Click on save and Exit Integration Editor.

Step 13:
Now Click on Activate to deploy your integration.

Step 14:
Select tracing checkbox to Enable Deep data tracing.

This is all, We have successfully created and Deployed our integration using Oracle ICS.

More Learnings on ICS
1. Oracle Integration Cloud Service (ICS)
http://osb-dheeraj.blogspot.in/2016/02/oracle-integration-cloud-service-ics.html
http://osb-dheeraj.blogspot.in/2016/02/oracle-integration-cloud-service-ics_10.html
http://osb-dheeraj.blogspot.in/2016/02/invoke-web-service-hosted-at-oracle.html
Wednesday, February 10, 2016
Oracle Integration Cloud Service (ICS) - Monitoring and Tracking Messages & Errors
In this post I am going to discuss about the Monitoring & Message tracing functionality of the Oracle Integration Cloud service (ICS).
Before we begin, Here are few previous posts on ICS which may interest you :


Before we begin, Here are few previous posts on ICS which may interest you :
1. Oracle Integration Cloud Service (ICS)
http://osb-dheeraj.blogspot.in/2016/02/oracle-integration-cloud-service-ics.html
http://osb-dheeraj.blogspot.in/2016/02/integration-using-oracle-ics-source.html
http://osb-dheeraj.blogspot.in/2016/02/invoke-web-service-hosted-at-oracle.html
Let's Start with Monitoring of ICS:
Login to your ICS portal, you will see a homepage similar to this

Click on Monitoring, this will navigate to Dashboard. you will see a dashboard similar to below

Dashboard contains monitoring information about your active integrations. Last 3 days data is available for these integrations.
Monitoring Data presents various insights about the integrations and their Runtime behaviour.
At the Bottom, there are two Tabs, Integrations (It list all Integrations, shown in above Screen), Activity Streams (It list recent transactions at Source request, target request, response etc with Instance ID, Shown in Below Screen)

Now, we will take a look at Tracking Tab.

You remember, while designing a integration, we had added input field for tracking purpose. Tracking Tab keeps details like InstanceID, Time of Request, Status, Value of Tracking field etc.
Now if you want to dig down a particular instanceID, Click on the Source Field, It will open a graphical representation of that IntanceID. Shown Below

Now if you want to see your Business Identifiers, which was added during Integrations design, Click on the Business Identifiers button at top of Screen,

If you want to See a Audit trail of Message flow, Click on 'Actions' on top right corner, then Select 'View Audit trail', It will show trail of message flow like below

Lets head back to Dashboard, Now if you want to look for any failed or Errored out instance, Click on the Error as shown below.

One of the Legacy Logs like feature is also included in ICS. Since we are familiar with Logs in Weblogic Servers and SOA systems. If you want to download Logs of the Integrations and Instances. Go to Dashboard. Now open 'Activity Stream' Tab at bottom. Here you will find a option to Download Logs.

These Logs are Legacy Weblogic Style logs.
Since Oracle ICS uses Oracle Service Bus 11g at Backend for Integrations, Hence these logs are similar to OSB tracing Logs.
Tuesday, February 09, 2016
Invoke Web service hosted at Oracle Integration Cloud Service (ICS) using SOAPUI
In this post we will invoke a Web service using SOAPUI, The web service is hosted at Oracle Integration Cloud Service (ICS).
If you want to go through the the Introduction of Oracle ICS, refer my previous post at:


The further steps are given in my next Post at:
If you want to go through the the Introduction of Oracle ICS, refer my previous post at:
1. Oracle Integration Cloud Service (ICS)
http://osb-dheeraj.blogspot.in/2016/02/oracle-integration-cloud-service-ics.html
2. Oracle Integration Cloud Service (ICS) - Monitoring and Tracking Messages & Errors
http://osb-dheeraj.blogspot.in/2016/02/oracle-integration-cloud-service-ics_10.html
3. Oracle Integration Cloud Service (ICS) - Monitoring and Tracking Messages & Errors
http://osb-dheeraj.blogspot.in/2016/02/oracle-integration-cloud-service-ics_10.html
Lets start with testing steps for ICS web service.
Note: Since Oracle ICS is publically hosted cloud at Internet, hence ICS webservice will always be a secured service i.e. protected by some security policy.
There could be two possible ways, how you get a web service hosted Oracle ICS.
Scenario 1:
Some target system provides you the WSDL and WSDL URL of target service and Security credentials. This service is not developed by you.
You can also download wsdl from URL given. A URL will look something similar to below one
https://ics-mycompany.integration.us2.oraclecloud.com/integration/flowsvc/soap/DEMO_AIRPORT_INTEGRATIO/v01/?wsdl
Scenario 2 :
You have created a Integration using Oracle ICS, either for Demo purpose or Actual Integration.
Here are steps to Get the WSDL URL from your ICS designer portal.
Step 1:
Login to your Oracle ICS portal. Home page look similar to below. Click on Integrations

Step 2:
Locate your Integration (In previous Post we created, Demo_Airport_Integration). Click on the 'i' button located at right side of screen in the same box as your integration. A pop up window will appear. Copy the Endpoint URL from pop up window.


Now lets start with creating a project in SOAPUI. (Recommended SOAPUI version is 5.2.1)
SOAPUI testing :
Step 1:
Launch SoapUI, Click on File --> New SOAP Project. This will launch new project wizard

Step 2 :
Provide Project Name, and enter WSDL URL in 'Initial WSDL' field.
Then Click OK button. This will take sometime to download to WSDL and create a new project.
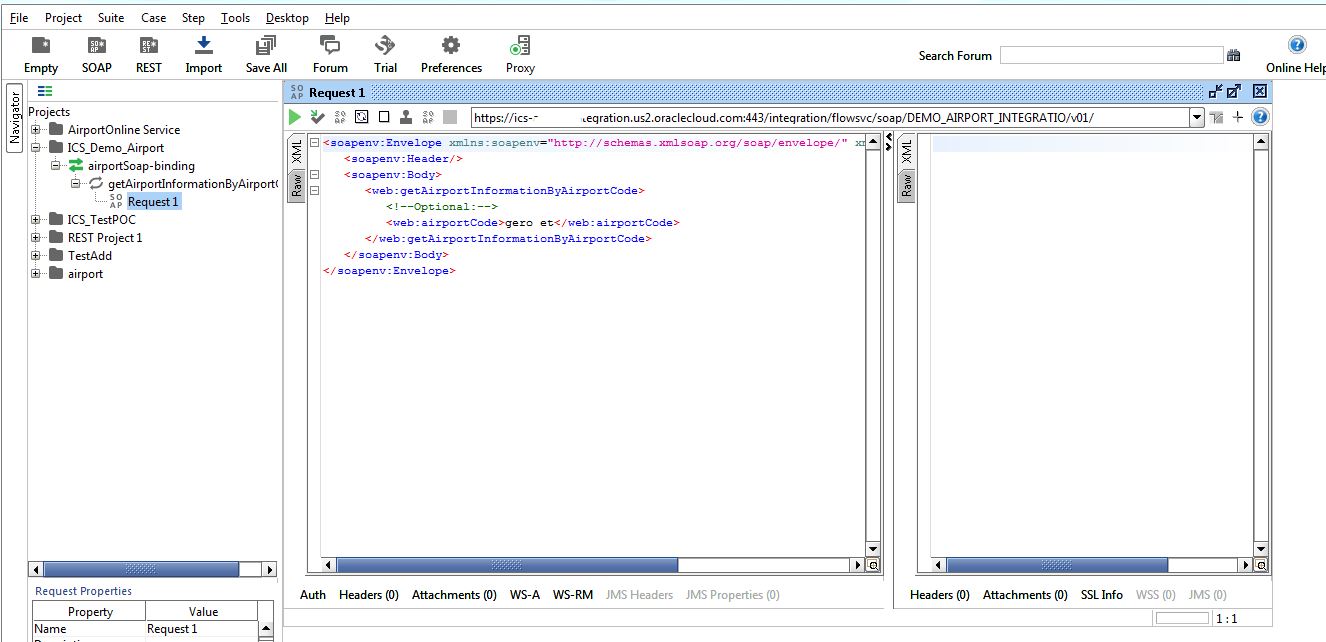
Step 3:
Click on the 'Auth' Button at Bottom of the request tab. This will open a small window at bottom.

Step 4:
In the newly opened wind at bottom, Select 'Add New Authorization' from drop down against authorization.

The further steps are given in my next Post at:
Invoke Web service hosted at Oracle Integration Cloud Service (ICS) using SOAPUI - Part 2
http://osb-dheeraj.blogspot.in/2016/02/invoke-web-service-hosted-at-oracle_17.html
Subscribe to:
Posts (Atom)